CTF and introduction to IoT development with MicroPython for HackConRD2025
Watch HackConRD2025 Highlights Video
Bottom line up front
In this post, we'll demonstrate how to program a nice LED weather map using an ESP32C3 microcontroller with MicroPython and data from OpenWeatherMap API.
Additionally, this project will serve as the badge for HackConRD 2025, where we'll be hosting a CTF focused on reverse engineering this themed IoT device.

Photo by FotosMalasPeroMias
👾 FINAL CTF SCOREBOARD 👾

🏁 HackConRD2025 – CTF Badge Challenge Wrap-Up
Verpent would like to acknowledge the top performers of the HackConRD2025 CTF Badge Challenge, both of whom successfully completed the challenge with full points:
🥇 First Place – zer0
🥈 Second Place – lich
Solid work from both participants, and a quiet nod to the persistence and technical depth it took to make it through. This wraps up the badge challenge for this year.
Getting started with IoT development and MicroPython
In this project, we'll be displaying weather information onto the map of the DR🇩🇴!
Hardware & Software
The ESP32C3 is a powerful and cost-effective microcontroller with built-in Wi-Fi and Bluetooth, making it an excellent choice for IoT projects. One key application of IoT is real-time weather monitoring, where microcontrollers gather environmental data from sensors or in our case from Internet sources.
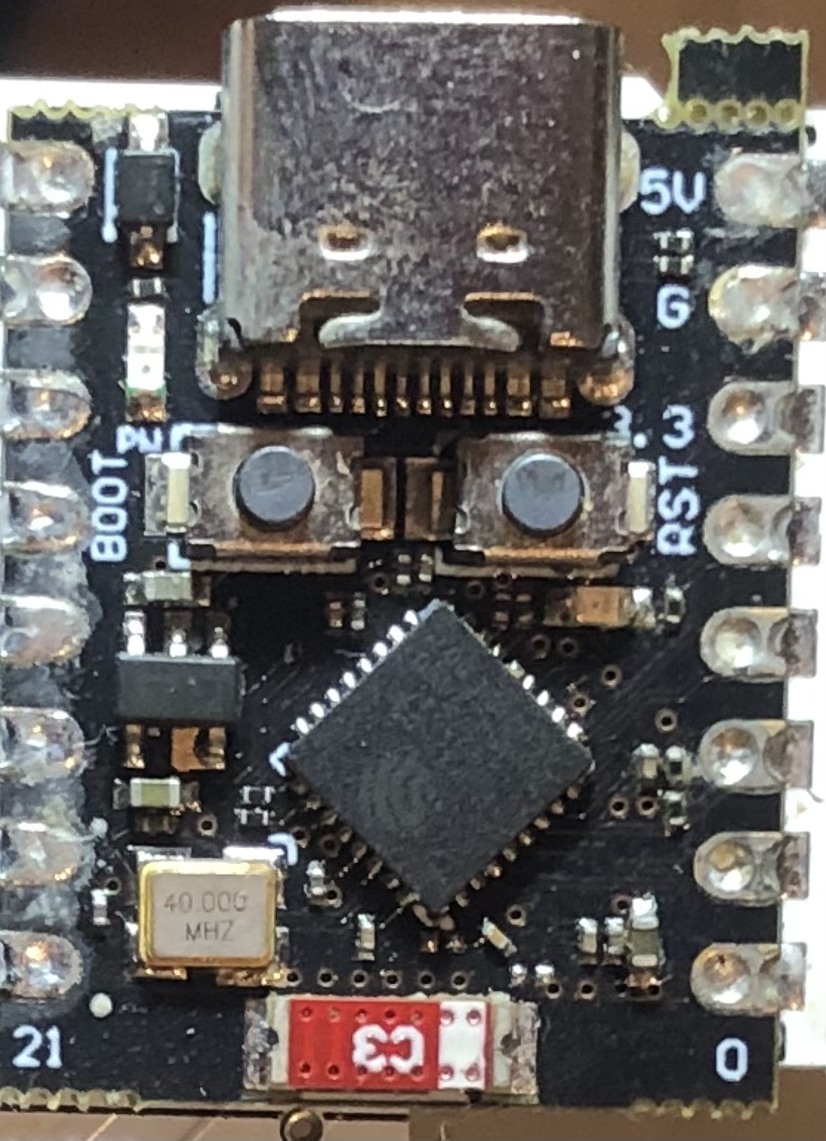
ESP32C3 breakout board
To build this project, you'll need:
- An ESP32C3 microcontroller
- A Wi-Fi connection
- MicroPython firmware installed on the ESP32C3
- An OpenWeatherMap API key
Without any more delay let's start implementing the project
Setting up the development environment
Installing rshell
First, install rshell. You can learn more about the project here: https://pypi.org/project/rshell/
python3 -m pip install rshell
⚠️ The serial port may appear with different names depending on the operating system. On Windows, for example, it could be COM4. ⚠️
/Library/Frameworks/Python.framework/Versions/3.11/bin/rshell -p <your-serial-port> -b 115200
Write the code that will run on the microcontroller chip
Complete Code
In your favorite code editor start by importing the libraries needed to run the project:
Then write a function that connects to a Wi-Fi access point:
The main part of the code is translating weather data to LED color on the board, here's the code for that:
And finally, our entry main function.
Setting up an OpenWeatherMap Account
- Create an account at OpenWeatherMap Sign Up
Fill out the following form:
OpenWeatherMap will send a confirmation email for the new account. Proceed with the confirmation and log in using the created account.
Generate a new API key
Replace the API key and Wi-Fi credentials in the code. With that, we're ready to proceed with uploading the code to the board. We explain how to do this below.
Upload Code to ESP32C3
First, connect to the board:
/Library/Frameworks/Python.framework/Versions/3.11/bin/rshell -p <your-serial-port> -b 115200
To upload and run code in MicroPython, we use two scripts: boot.py and main.py.
⚠️ Do not touch boot.py ⚠️
boot.py runs once MicroPython has loaded on the board — this should not be modified.
✅ We modify main.py ✅
We upload our code as main.py by copying it to the board:
cp main.py /pyboard/main.py
Finally, we run the code:
Enter the repl interpreter:
repl
To run our main.py:
import main
Visualizing weather data
To represent weather conditions, we are using a 31 aRGB LED array, with each LED corresponding to one of the 31 provinces. The LEDs will change color based on weather conditions:
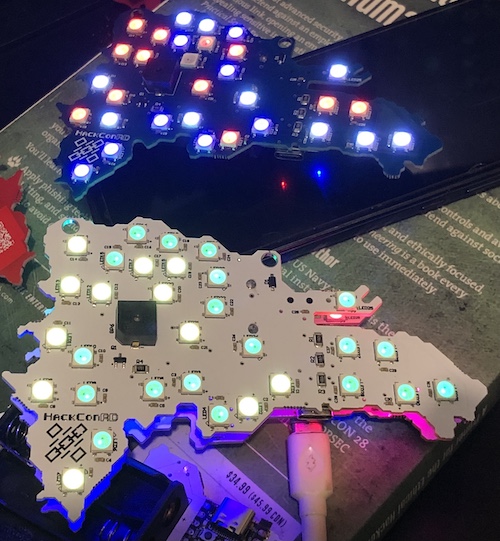
PCB design by Emeraldo Ramos
This provides an intuitive way to quickly visualize weather patterns across the country:
- Red: Hot temperatures
- Yellow: Fair weather
- Green: Cool but dry conditions
- Blue: Heavy rain
You can find full code as well as Spanish translation in the following link
Leave a ⭐ if you like the project
https://github.com/jrgdiaz/Weather-Micropython-HackConRD2025